Anatomy Mechanics Therapy  /  Free starter protocol

Your ribs aren't weak.
They're stuck open.

Three exercises, three weeks, about ten minutes a day. Built around the one thing almost every rib flare program skips: a complete exhale.

3 exercises 3 weeks One 6″ ball Beginner
ZOA GAP

Flared, small ZOAZOA is the strip where your diaphragm touches the inside of your lower ribs. Ribs up and out means a short strip, a flat diaphragm, and a cage stuck in half-inhale.

ZOA

Stacked, big ZOARibs down over the pelvis means a long strip, a domed diaphragm, and a breath that works again. Bigger strip, better breathing.

01  /  The mechanism

What rib flare actually is

You look down and the bottom edge of your ribs sits up and out, far enough that you can hook your fingers underneath. Usually it comes with a low back that never quite relaxes, a chest that feels like it's always slightly puffed, and a breath that lives high.

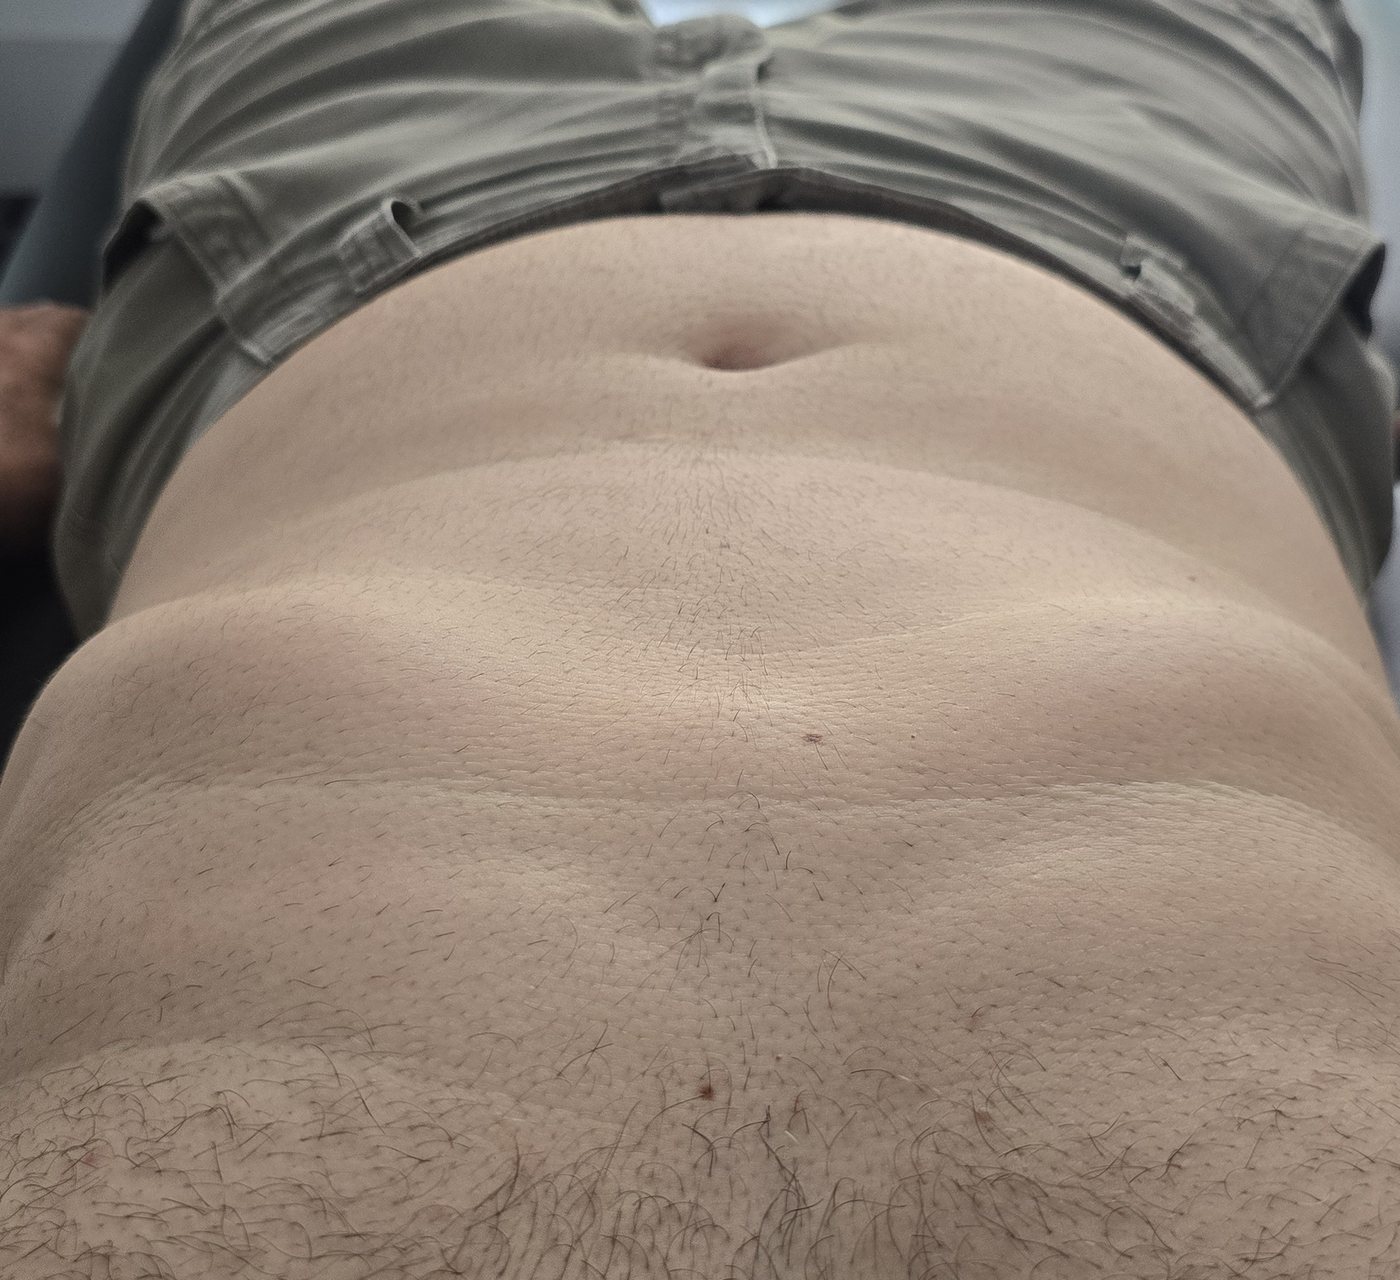
A person lying on their back on a treatment table, viewed from the feet, with the lower edge of the rib cage visibly raised and open.
What it looks like lying downFlat on your back, fully relaxed, the lower ribs should settle. Here they stay up and open instead. The cage is holding a position it should be able to let go of. This is the view from the feet looking up the body, one of the two angles that works for photo A below.

The reflex is to blame a weak core. That's almost always wrong, and it's why more ab work tends to make it worse.

Here's the actual mechanic. Your diaphragm is a dome, not a sheet. It sits inside the lower rib cage, and there's a band where it presses flat against the inner rib wall, called the zone of apposition. That band is the diaphragm's leverage. It's what lets it pull down cleanly when you inhale.

When the rib cage tips up and open, the dome flattens and that band gets short. The diaphragm loses leverage as a breather and starts behaving more like a back extensor. Your neck and chest pick up the slack. And because a rib cage that never fully empties can't come down, it stays parked where it is.

Look at it from the front and the mechanic gets obvious. The outer fibers of the diaphragm, the costal fibers anchored to your lower ribs, don't run sideways across your body. They run straight up, lying flat against the inner surface of the lower rib cage. That strip of direct contact is the zone of apposition, and it is at its longest at the end of a full exhale.

Rib cage Dome Abdomen Zone of apposition
Frontal section · end of exhaleThe diaphragm's costal fibers run upward and sit directly against the inner wall of the lower rib cage. A tall strip of contact with a clear dome above it is an optimal ZOA. A rib cage held open flattens the dome and shortens that strip to almost nothing. That's a sub-optimal ZOA, or a flat diaphragm. Same muscle, completely different leverage.

Your abs aren't too weak to pull the ribs down. They can't reach the ribs, because the ribs never arrive.

So the fix isn't tension and it isn't reps. It's a full exhale, performed in a position where your low back and pelvis can't cheat their way out of it. Get the air all the way out, and the ribs have somewhere to go. That's the entire premise of the next three weeks.

02  /  Baseline

Take three photos before you start

You will believe a picture long before you believe a feeling. These take a minute, and they are the only way you will know whether anything changed. You will retake all three on Day 21.

A

Ribs at rest

Lie on your back, knees bent, feet flat, and let everything go. Get a photo of your lower ribs: hold the phone above you, or have someone shoot from your feet looking up your body. Either angle works. What matters is that you can repeat the exact same one on Day 21. Don't suck in and don't fix anything.

B

Ribs at the end of an exhale

Same position, same camera angle, taken about thirty seconds later. Breathe all the way out through your mouth, slowly, until there is genuinely nothing left. Take the photo at the very bottom of that exhale, before you breathe in again.

C

Standing, from the side

Stand against a blank wall the way you normally stand. Don't pose, don't straighten up. One photo from the side, phone held level with your hip. Save it somewhere you will find it again.

Now put A and B side by side. For most people the two photos look almost identical, and that is the whole problem in one picture: the exhale is stopping somewhere before it reaches the rib cage. Everything below is aimed at making those two photos look different.

Which side flares?

Look at photo A again. Most rib cages flare more on one side than the other, and you'll need to know which before Exercise 03. Two things give it away: the lower rib edge on that side sits higher than the other, and that side looks wider and more open.

L R

Left rib flareYour left side. The lower rib edge sits higher than the right and the cage looks wider and more open on that side.

L R

Right rib flareYour right side. Same thing mirrored: the right rib edge sits higher and that side looks wider.

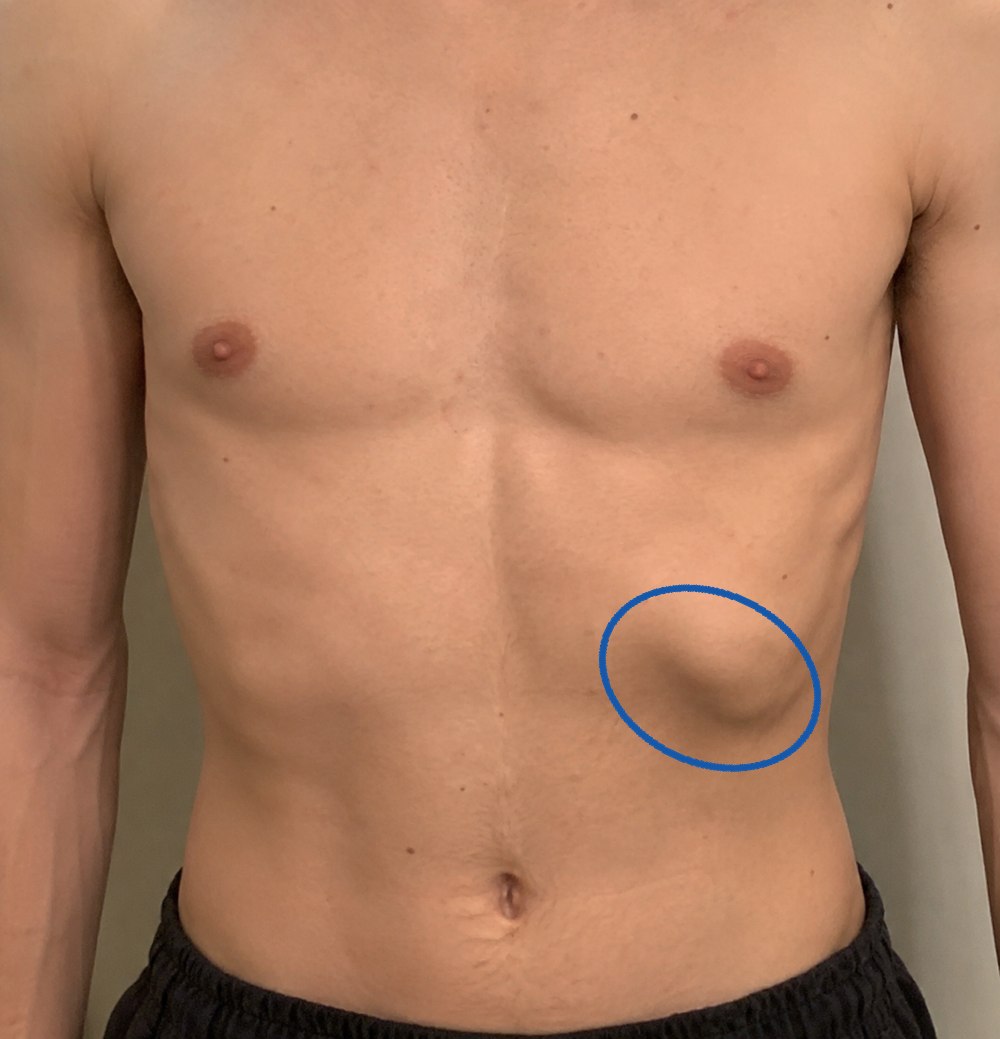
Front view of a torso from the collarbones to the waistband. The lower rib margin on his left side, which appears on the right of the photo, is circled where it sits higher and stands out further than the other side.
The same thing on a real bodyThis is me, and this is a left rib flare. You're looking at me from the front, so my left side is on the right of the photo. Inside the circle the lower rib edge sits higher and stands out further than it does on the other side. Hold your own photo A up and compare your two halves the same way.

If neither side stands out, or you genuinely can't tell, that's a normal answer and it doesn't stop you. Exercise 03 has a version that works either way.

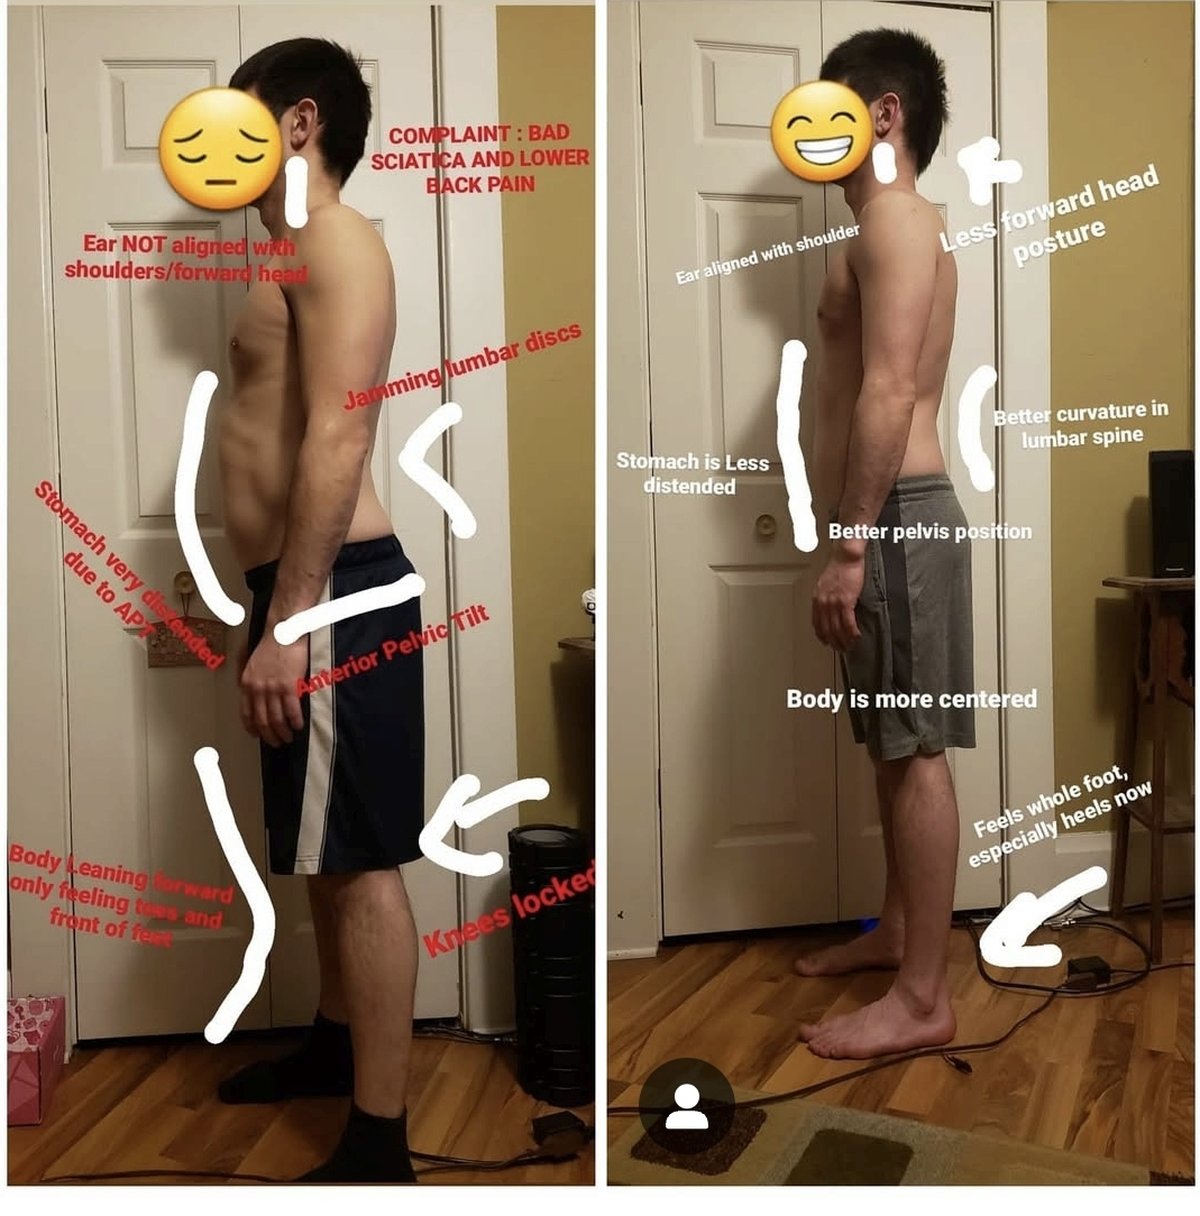
Two side-profile photos of the same client. Before, on the left: forward head, anterior pelvic tilt, distended stomach, locked knees, weight on the toes. After, on the right: ear over shoulder, better pelvis position, body centred, weight through the whole foot.
Why the side photo is worth takingA 1:1 client of mine, before on the left and after on the right. He came to me with sciatica and low back pain. We worked twice a week over video for three to four months, and I never met him in person. To be clear about what you're looking at: this is a full individualized program, not three weeks of the three exercises below. It's here because almost none of what those photos show was visible to him in the mirror. You can't see a change you never recorded.

03  /  The protocol

Three exercises, in this order

This is a starting point, not a fix. Three beginner exercises that get most people their first real exhale, and that is genuinely all they are for. The order matters: the first finds the position, the second makes it hold while you're loaded, the third takes it upright. Don't skip ahead, because the third one is useless if you can't do the first.

What you'll need

6″ playground ball

Goes between your knees in Exercise 01. Gives your inner thighs something to work against so the position holds.

Get one →

12″ balloons

A progression for Exercise 03, once the basic version clicks. The resistance is what keeps your abs on through the whole exhale.

Get some →

Everything else you already have: a wall or a chair, floor space, and something about three inches high to sit on, like an aerobic step, a low stool, or a stack of books.

Exercise 01  ·  Find the exhale

Supported Exhale, 90/90

Position
Supine, feet elevated
Equipment
6″ ball
Dose
4-5 breaths × 3
Tempo
5s out / 3s hold
Frequency
2× daily
Time
~4 min

Why it's first

If your pelvis is tipped forward, the exhale gets absorbed by your low back arching and never reaches the lower ribs. Putting your feet up and tilting the pelvis takes that escape route away, so the air has to come out of the cage.

How to do it

  1. Lie on your back with your feet flat on a wall or on a chair seat, hips and knees at roughly 90 degrees. Arms at your sides, palms up. Put the 6″ ball between your knees.
  2. Squeeze the ball lightly, about a quarter of your strength, just enough to feel your inner thighs switch on.
  3. Now use your feet to grip down on the wall, as if you were trying to rub the paint off it with your feet. Grip downward, not forward. That is what turns your hamstrings on, and it should bring your tailbone about an inch off the floor so your low back settles flat. You are not pushing yourself into a bridge.
  4. Exhale slowly through pursed lips for about five seconds, and keep going past where you'd normally stop. The last 20% is the part that matters.
  5. Pause with the air out for three seconds. This pause is the exercise. Everything else is setup.
  6. Inhale quietly through your nose without letting your back arch or your ribs pop back up. Then repeat.

You've got it when

Your hamstrings are working and your inner thighs are lightly on. You feel a low, wide abdominal engagement around the sides of your waist, not just down the front. Neck and jaw completely quiet.

You've lost it when

You're pushing forward through your toes instead of gripping down, your hips are high in a bridge, your low back is arched, you're crushing the ball or squeezing your glutes, or you feel the effort in your neck. Any of those means the position collapsed. Reset and take less range.

Exercise 02  ·  Hold the position

All-Four Belly Lift

Position
Quadruped, toes tucked
Dose
4-5 breaths × 3
Tempo
5s out / 3s hold
Frequency
1-2× daily
Time
~3 min

What it adds

Exercise 01 teaches your body where the ribs go. This one teaches the abdominal wall and upper back to hold them there while you're loaded. It's the direct opposite of the chest-open, extended posture that keeps a flare in place.

How to do it

  1. Hands and knees. Hands under shoulders, knees under hips, toes tucked under.
  2. Push the floor away hard through both hands and let your upper back round. Imagine the space between your shoulder blades lifting toward the ceiling.
  3. Tuck your tailbone under so your low back rounds too. The whole spine should feel long, front to back.
  4. Exhale all the air out through pursed lips, drawing your belly up toward your spine as it leaves. Hold empty for three seconds, then hover by lifting your knees an inch off the floor and holding them there.
  5. Set the knees down and inhale through your nose into your back, widening the space between your shoulder blades from the inside, without letting the rounded position flatten out. Four to five breaths, rest, three sets.

If the hover is too much at first, keep your knees down and just hold the exhale. Add the hover once the rounded position stays put without you thinking about it.

You've got it when

Deep, sustained abdominal work with the upper back clearly involved. Your back feels long rather than braced, and you can feel the inhale go into it. You can still breathe through your nose.

You've lost it when

Your back sags into a dip, your elbows lock and your shoulders creep toward your ears, or you end up holding your breath instead of moving it.

Exercise 03 · Take it upright

Short Seated Step

Position
Seated, low step
Dose
4-5 breaths × 3
Tempo
5s out / 3s hold
Frequency
1× daily
Time
~4 min

What it adds

The first two work while you're lying down or on all fours. This one takes the same exhale upright, with your hips folded so deeply that the pelvis sits where you want it without you having to hold it there. Reaching for the foot on your flared side goes one step further: it pulls your low back long, so the air has somewhere to go that isn't your lumbar spine. This is usually where people first feel their mid back breathe.

How to do it

  1. Sit low on a three-inch step, a folded mat, or a low stool. Knees up toward your chest, feet flat on the floor in front of you.
  2. Let your low back round. Don't sit tall; the low seat does the pelvic tilt for you.
  3. Reach forward and take hold of the big toe on the side your ribs flare. Left rib flare, left big toe. Right rib flare, right big toe. If both sides flare, or you can't tell which it is, hold neither and simply keep your arms wrapped around your knees. Look back at photo A and the two rib cage drawings above if you're unsure. Can't reach the toe comfortably? Hold that ankle or shin instead, because the reach is the point, not the toe.
  4. Put your free hand flat on your mid back, between your shoulder blades, as far as you can reach. Breathe in through your nose and send the air into that hand, the same expansion you were after in Exercise 02. Feeling it move under your palm is the entire skill.
  5. Your low back stays quiet. If you feel the breath down there instead, you've lost it. Round a little more and try again with less air.
  6. Exhale all the way out through your mouth, past the point where it feels finished, and hold empty for three seconds. Your lower ribs should travel down and back.
  7. Inhale again into the mid back without letting your ribs lift. Four to five breaths, rest, three sets.

In the video I'm coaching a client through it. One hand on her mid back shows her where to send the breath; the other, lower down, shows her where not to. Your own hand does the same job.

Progression: once you can find the mid-back expansion every time, blow into a 12″ balloon on the exhale instead of just breathing out. The resistance keeps your abs working through the whole breath. Stop and rest a minute if you get lightheaded.

You've got it when

The inhale expands across your mid back and ribs, under your hand. Your lower ribs settle down and back as you breathe out. Your low back stays long and quiet the whole time.

You've lost it when

You sit up tall and arch, the breath goes into your chest or your low back, you're straining to hold the toe, or your shoulders climb toward your ears. Sitting on something too high causes most of these. If the reach is costing you the rounded back, drop it and hold your knees instead.

04  /  Dosage

The three-week build

Consistency beats volume here by a wide margin. Ten focused minutes a day will outwork forty minutes twice a week, because you're re-teaching a resting position, not building a tissue. Give it the full three weeks before you judge it. Most people see nothing in the first week and that is normal.

Days 1 to 3
Exercise 01 onlyTwice daily, morning and before bed. Roughly 8 minutes a day total.
Goal: get the exhale to the ribs
Days 4 to 7
Exercise 01 + 0201 twice daily, 02 once daily. Roughly 10 minutes a day.
Goal: hold it under load
Days 8 to 14
All three, in orderOne full session daily, 01 then 02 then 03. Roughly 10 minutes.
Goal: hold it upright
Day 14
First photo checkRetake A and B only, the two lying down. This is the earliest most people see anything, and plenty of people see nothing yet.
Goal: an early look, not a verdict
Days 15 to 21
All three, dailySame session. By now it should take less thinking and more of it should hold on its own.
Goal: make it the default
Day 21
Retake all three photosSame positions, same angles. Put them beside the Day 1 set and compare honestly.
Goal: decide what's next

Track it

Tap a day when you've finished that day's session. This saves in your browser on this device.

0 of 21 days complete.

05  /  Outside the session

Three habits that matter more than the exercises

Ten minutes of good position doesn't outrank fifteen hours of bad position. These three cost nothing and do more of the work than the exercises do.

Standing

Stop resting in the flare

The default "relaxed" stance, with hips pushed forward, ribs pushed up and weight in the toes, is the flare position held for hours. Shift your weight back toward your heels and let your ribs sit down. It should feel like slightly less effort, not more.

Training

Exhale before you load

Before any set, whether it's a press, a squat, a carry or anything overhead, get the air out first and then brace. Starting a lift from a full chest locks the flare in under load, which is where it sticks.

Sleeping

Get off your stomach

Face-down sleeping holds you in extension for seven or eight hours a night, longer than every session you'll do this month combined. Side or back, with a pillow that doesn't crank your head up.

06  /  The honest part

Where this stops working

I'd rather tell you the ceiling now than have you assume there isn't one.

These three exercises are entry-level, general, and symmetrical. You are not symmetrical. The right side of your diaphragm is larger and has a liver sitting under it; the left has less structural support underneath. Nearly everyone settles into a predictable pattern because of it. One side grips, one side never quite gets air, and the rib cage ends up rotated as much as it's flared.

For the first couple of weeks that doesn't matter much. A general exhale strategy produces real change in almost anyone, because almost nobody is doing it. After that it stalls, and it stalls precisely because a symmetrical program treats both sides as if they were the same problem. They aren't.

So: give it the full three weeks. If your Day 21 photos moved, you're a responder. Keep going, and the next step is progressing the load and dealing with your specific side. If it didn't, more repetitions of these three won't fix it.

Stop and get assessed if any of these apply

  • Pain anywhere in your ribs, back, neck or shoulder during or after these exercises.
  • One side consistently feels different. You can find the position on one side and never on the other.
  • You're postpartum, or you have a diastasis.
  • You're hypermobile, so you can get into any position easily but nothing ever holds.
  • It works lying down and completely falls apart the moment you stand or lift.
  • Three weeks in and your Day 1 and Day 21 photos look identical.

An assessment isn't more exercises. It's finding which specific positions you can't get to, on which side, and why, then giving you the two to four exercises that are yours instead of everyone's. That's the difference between a program that plateaus at week three and one that keeps moving.

07  /  Next step

When you're ready for the version built for you

Finish the three weeks first. If your photos moved, this is how you progress it. If they didn't move, this is how you find out why. It works wherever you are. I'm based in Bradenton, but nearly all of this happens over video. More about the practice at anatomymechanicstherapy.com.

5.0 ★★★★★ GOOGLE Average rating on Google
from people I’ve treated  /  Read them all
“Jay is amazing! He has been working with me on my frozen shoulder! His assessment was one of the most thorough I've ever had - he clearly knows anatomy!”
Rachel SmithGoogle review
“I have been working with Anatomy Mechanics for about two months now and it has absolute changed my life. I am a professional Personal Trainer and this guy has rocked my world.”
Jake RathGoogle review
“If you have chronic pain and don't want injections and pills and are weary of chiropractors like me this is the place for you. Jay is knowledgeable, patient and sincere.”
Nathalie MerhyGoogle review

1:1 Online Assessment

Get a program that's actually yours

  • A live 60 minute video session where I watch you move and breathe, and find the positions you can't get to
  • Which side is driving it, and why
  • Two to four exercises tailored to what we actually find during the consultation, with written cues and dosage
  • Follow-up packages available at a saving, or book individual sessions as you need them
  • Done entirely over video. Most of the people I work with I have never met in person
  • If a partner or a friend is around, I'll walk them through the simple hands-on work so they can help between sessions. It speeds things up. It isn't necessary
$199

60 minute session
Rate for people who came
through this free program

Message me “ASSESSMENT”→

Please read. This program is general educational information, not medical advice, and it isn't individualized to you. It's not a diagnosis and it's not a substitute for evaluation by a licensed healthcare provider. Stop immediately if anything here causes pain, dizziness, or shortness of breath. Talk to your doctor before starting if you're pregnant or postpartum, have had recent abdominal or thoracic surgery, or have any cardiac, respiratory, or spinal condition. By using this program you accept that you do so at your own risk.